Pages

Wednesday, June 29, 2011

Change Your Bash Prompt

The Bash command prompt can easily be changed by modifying the value of the PS1 environment variable. For example: PS1='yes master?> ' will change your command prompt in terminal to "yes master?> ". If you want your command prompt change to become permanent add it to your .bash_profile or .profile file in your home directory.

In addition to changing your bash profile to a simple string of text there are a number of special characters that can be used. The special characters can be used to add things like the current working directory or the current time to your prompt. Below is a list of these special characters taken from the bash manual:

\a A bell character.
\d The date, in "Weekday Month Date" format (e.g., "Tue May 26").
\D{format} The format is passed to strftime(3) and the result is inserted into the prompt string; an empty format results in a locale-specific time representation. The braces are required.
\e An escape character.
\h The hostname, up to the first `.'.
\H The hostname.
\j The number of jobs currently managed by the shell.
\l The basename of the shell's terminal device name.
\n A newline.
\r A carriage return.
\s The name of the shell, the basename of $0 (the portion following the final slash).
\t The time, in 24-hour HH:MM:SS format.
\T The time, in 12-hour HH:MM:SS format.
\@ The time, in 12-hour am/pm format.
\A The time, in 24-hour HH:MM format.
\u The username of the current user.
\v The version of Bash (e.g., 2.00)
\V The release of Bash, version + patchlevel (e.g., 2.00.0)
\w The current working directory, with $HOME abbreviated with a tilde (uses the $PROMPT_DIRTRIM variable).
\W The basename of $PWD, with $HOME abbreviated with a tilde.
\! The history number of this command.
\# The command number of this command.
\$ If the effective uid is 0, #, otherwise $.
\nnn The character whose ASCII code is the octal value nnn.
\\ A backslash.
\[ Begin a sequence of non-printing characters. This could be used to embed a terminal control sequence into the prompt.
\] End a sequence of non-printing characters.

Friday, June 24, 2011

Fun With Speech Synthesis

This is a fun way to freak out anyone around a remote Mac using SSH and the builtin text to speech libraries in OS X. The idea is to SSH into a remote Mac and execute the say command, which will convert a string of text into speech. You can use this to "talk" to people around your remote Mac. For example:

say -v "Zarvox" "hello world"

Will speak the phrase "hello world", using the voice Zarvox. If you don't specify a voice the default from the System Preferences will be used. Here is a list of other voices you can use:

Alex
Bruce
Fred
Junior
Ralph
Agnes
Kathy
Princess
Vicki
Victoria
Albert
Bad News
Bahh
Bells
Boing
Bubbles
Cellos
Deranged
Good News
Hysterical
Pipe Organ
Trinoids
Whisper
Zarvox

On the off chance that the Mac you are attempting to have speak has its volume turned down or is muted, you can also turn the volume up using the following command:

sudo osascript -e "set Volume 10"

This will set the system volume to maximum to ensure that any bystanders can hear your Mac speak. Setting the volume does however require the root password.

Monday, June 13, 2011

Programmatically Calculate Battery Charge

This is a cool way to determine what the charge of your battery is on a Mac laptop using Perl. Basically we execute the command ioreg -l in a shell and filter out all the results except MaxCapacity and CurrentCapacity, then we use regular expressions to parse out just the values. From there it's just a matter of calculating what percentage current capacity is of the max capacity and printing out the results.

#!/usr/bin/perl -w

my $MaxCapacity = `ioreg -l | grep 'MaxCapacity'`;
my $CurrentCapacity = `ioreg -l | grep 'CurrentCapacity'`;

$MaxCapacity =~ /(\d+)/;
$MaxCapacity = $1;

$CurrentCapacity =~ /(\d+)/;
$CurrentCapacity = $1;

printf("Battery Charge: %d %%" . "\n", (($CurrentCapacity / $MaxCapacity) * 100));

Executing the script produces something similar to:

Battery Charge: 90 %

If you execute this on a Mac that doesn't have a battery you will probably get a division by zero error.

Friday, June 10, 2011

Shorten a URL on bit.ly using CURL

I often have to shorten URLs when I'm tweeting or simply sending a URL to a friend via email or on instant messenger. Since I generally have a terminal window open I figured it would be expeditious to come up with a shell script to do this for me.

The first thing you have to do is sign up for an account on bit.ly if you haven't already, next you have to obtain an API key. You can sign up for a bit.ly account at: http://bit.ly/a/sign_up if you already have an account you can get your API key at: http://bit.ly/a/your_api_key.

First create a shell script called shorten.sh:

#!/bin/bash

curl -s "http://api.bitly.com/v3/shorten?login=YOURLOGIN&apiKey=YOURAPIKEY&longUrl=$1&format=txt" | pbcopy

This script uses curl in silent mode to connect to the bit.ly API and shorten the url specified by longUrl. Since we want to shorten a variety of URLs I've used $1, which refers to the first argument the script was invoked with. You'll also notice the format parameter, this can be set to xml, json or txt, we're using txt so we don't have to do any parsing. We are piping the output of our curl command into pbcopy a command line utility provided by OS X which provides copying to the clipboard. Pbcopy basically copies all output it receives into the clipboard.

Make sure to fill in YOURLOGIN with your bit.ly login and YOURAPIKEY with your bit.ly API key. Save the shell script somewhere it's not going to be deleted by accident or moved. If you use bash open your .bash_profile file in your home directory. You may have to create it if you haven't made any changes to it before. Add the following line:

alias shorten='/bin/bash /PATHTOSCRIPT/shorten.sh'

Where PATHTOSCRIPT is the path to where you have stored your script. This alias will allow us to invoke our script from anywhere using "shorten" instead of the full path to the script. In order for your .bash_profile to be reloaded and the alias to become active, you need to either type source .bash_profile or open a new terminal window.

Now when you type:

shorten YOURURL

Where YOURURL is any URL you wish to shorten, the shortened version will be copied directly into your machine's clipboard.

Tuesday, June 7, 2011

Analytics For iOS Developers

I have a couple of iPhone apps in the App Store and I was getting quite frustrated with having to haul out a calculator every time I wanted to figure out how many downloads each of my Apps have in total. iTunes Connect seems to be very limited in the data it displays to developers and also how long that data is retained for.

Enter App Figures, a service that syncs with your iTunes connect account daily, and downloads and stores the data. In addition to storing updates, downloads, ranking, and reviews for each app in your account, it also stores iAd statistics. The data is presented in a really nice format with lots of graphs, it is quite reminiscent of Google Analytics.

If you're looking for a better way to keep track of your App Store apps check out http://www.appfigures.com. You can try out the service for free, and once the trial period is up it only costs $4.99 a month and includes tracking of 2 apps.

Friday, June 3, 2011

Five Mac OS X Apps I Can't Live Without

Jumpcut

Jumpcut remembers all of the text you've copied to the clipboard up to a hard limit that you specify. It provides a menu on the menu bar that shows you all the text you have copied to the clipboard. Everything is saved so text you have copied persists even after you restart your Mac.

In addition you can set a hot key, which shows a bezel, that can be used to scroll through all the items stored in Jumpcut. This can save you going back and forth to the menu item and once you get used to it can save you a lot of time.

I find this utility incredibly useful, as it allows me to copy several items and paste them one after another without having to go back and forth. I also constantly find myself needing items again after I've already copied something new into the clipboard.

The only caveat of this utility is it manipulates the clipboard using Command + V programmtically, which means it may not work properly in any application that uses a different key combination for pasting.

Jumpcut is free of charge and completely open source.

http://jumpcut.sourceforge.net

Quicksilver


Quicksilver is an awesome utility that allows you to do just about anything on your Mac with a couple keystrokes. Quicksilver takes a little getting used to but once you're acclimatized to it, it's difficult to live without.

Quicksilver indexes your hard drive, similar to spotlight and the UNIX locate utility. Quicksilver runs in the background and is activated with a keyboard shortcut you specify. Once Quicksilver is activated you can just start typing the name of a file or application and Quicksilver searches it's catalog and attempts to find it. From there you can open the file by pressing enter or you can type actions to be done to the file, like moving, and deleting. This is really just scratching the surface of what Quicksilver is capable of.

The bottom line is Quicksilver will make you more productive, by allowing you to manipulate files and applications in fewer keystrokes.

Quicksilver is freeware.

http://qsapp.com

Adium


Adium is a multi protocol instant messaging application. It allows you to add all your instant messaging accounts into one application. Adium displays one contact list and allows you to communicate with all your contacts as if they were all in the same account.

Adium supports: AIM, Jabber, MSN, Yahoo, Facebook, Google Talk and many more protocols. It also provides logging of chat transcripts and the ability to connect through a proxy server.

I occasionally switch back to iChat because it allows me to to do video chat over my AIM account, which I sometimes need for work. The Adium team is working on adding Audio and Video in the future.

Adium is free of charge and completely open source.

http://adium.im

BBEdit


BBEdit is a text editor designed for Web and Software developers. It provides a rich toolset while still being easy to use and lightweight.

BBEdit includes syntax colouring for pretty well every programming language you can imagine and also features autocompletion. It provides support for version control using CVS and SVN. One of my favorite features is the ability to open files over FTP and SFTP, this allows you to edit remote files as if they were local. BBEdit is also great for maniuplating text, it allows you to use grep regular expressions for find and replace operations.

If you need a powerful text editor BBEdit is the way to go; Bare Bones Software, the people who make BBEdit, also provide a free version of BBEdit called Text Wrangler which has a lot of the features of BBEdit.

BBEdit costs $99.99 dollars for an individual, but they also have educational pricing which is about half the cost.

http://bbedit.com/products/bbedit/

GeekTool


GeekTool is a cool System Preferences module that allows you to anchor the output of any shell command to your desktop. You can also monitor files like /var/log/system.log, and the image module lets you display the output of programs like MRTG, which generates server performance graphs dynamically.

With GeekTool you can see how much uptime your machine has or how much disk space is left on your drives without opening up a Terminal window. You can set how often the shell commands are executed and configure how they're displayed inlcluding font and colour. GeekTool shows up in your system preferences as it's own pane.

Geek Tool is free of charge and completely open source.

http://projects.tynsoe.org/en/geektool/

Thursday, June 2, 2011

Change Terminal Title With Bash

Programmatically change the title of the active Terminal window from the Bash Shell. This can be useful for a variety of things, I like to alias the names of the servers I connect to in SSH to simply the server's name. I also change the title of the Terminal window in the alias so I can keep track of which terminal window is connected to what server. If you open multiple tabs in Terminal the window title will also appear in the tab.

Changing the Terminal window is very straight forward simply type: echo -n -e "\033]0;WINDOW_TITLE\007" where WINDOW_TITLE is the string you want the title of the window to be. Changing the window title isn't permanent, and you can execute the command several times and only the most recent change will be reflected.

It is also possible to put variables into the window title, for example: echo -n -e "\033]0;$HOSTNAME\007" will change the title of the window to the name of the current host.

Wednesday, June 1, 2011

Surf Through a Proxy

Surf anonymously through an SSH tunnel to your home computer. This requires you have access to a remote computer with port 22 open and SSH server installed (should be installed by default on OS X, just enable remote login in the sharing panel).

For best results you should also use Firefox because it allows you to specify whether or not DNS lookup is done on the client or server side. If you use Safari or Chrome you the websites you visit will be obscured, but the local DNS server will still be used to look up addresses and it could reveal what websites you are visiting.

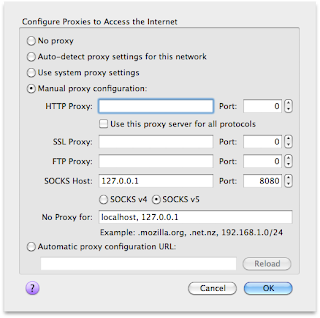
To start the proxy open a terminal window and type "ssh -ND 8080 <username>@<yourremotemac>" on the machine you want to surf anonymously on, where <username> is an account on your remote machine and <yourremotemac> is the IP address of your remote computer. This will start a SOCKS proxy on your remote machine and port forward all traffic on port 8080 on your local machine to the proxy. Because the proxy operates through SSH all traffic is encrypted and will not be interceptable by a third party. I'm using port 8080 but you can use whatever port you want as long as it's not in use by another service.

Next we have to configure Firefox to connect to the internet through a proxy. Open Firefox and select Preferences under the file menu, then select the Advanced tab and click the settings button next to where it says connection. The image below shows you how to configure the dialog box that appears.


Now Firefox needs to be configured to use remote DNS lookup. Type "about:config" into the address bar, you will get a warning dialog about voiding your warranty, click the "I'll be careful I, promise" button. Type DNS into the filter box or scroll down to the entry for "network.proxy.socks_remote_dns" and set the value to true. Firefox should now be connecting to websites through your proxy server. You can double check everything is working properly by navigating to a site like http://www.whatismyip.com/ and ensuring the IP reported is that of your remote machine and not your local machine.